This is where things start to get more specific and unfortunately also less one-size-fits-all. Lots of things can be implemented differently depending on your team’s tools, goals, type of product you work on if you’re a consulting shop or a product team and so on.
In part 1, I did my best to make the case for using Continuous Delivery in your Android development workflow. And hopefully, the reason you are here now is that you’re on board with the idea and want to know about the implementation details.
First things first
Instead of trying to go from nothing to a fully-automated Continuous Delivery pipeline in one go, I would recommend you start with one piece of the puzzle and then build on that, adding one piece at a time.
Well, which piece goes first? In general, whatever adds the most value is the best thing to do next. But when starting from nothing, this is almost always going to require getting the build server set up to compile your application. Let’s assume for now that you don’t have any automated tests as part of your project yet. We will add those in later.
Deciding on a Continuous Integration (CI) product is not easy. You have lots of options. The most common choice is probably Jenkins since it’s a free open source product and highly extensible. A great commercial product is JetBrains’ TeamCity which gives you a more polished experience and IMHO, everything that JetBrains does is pure gold. At stable/kernel, we went with Travis CI because they offer hosted build servers that support iOS. And since we use GitHub to host our source code, initial setup is almost as simple as a couple clicks of the mouse. (In general, we like to leverage cloud services and avoid managing physical servers inside of our four walls.) So, for the remainder of this series, I’ll walk you through the setup we use at stable|kernel which relies on GitHub and Travis CI.
Travis CI Setup
GitHub is so ubiquitous at this point, I’m not even going to talk about setting it up. If you need help on the subject, there are lots of resources on the internet. Let’s jump right to setting up a build server that automatically handles building your Android application when your code is committed to GitHub.
1- Signup
You’ll need to start off by signing up for an account which is actually as simple as performing an OAuth login using your GitHub account. If you need to enable organizations, the same model used inside GitHub will carry over. You will get a free trial period for private repos and it’s always free for public repos.
2- Add the repository
Now that you have an account and are logged in, select a GitHub repository that you want to “turn on” inside of Travis so that it starts to monitor the check-ins and kick off builds for you. NOTE: You will need to have admin level access to a repo in GitHub to turn it on.
3- Add the configuration file
Once this repo has been turned on, you will need to add a new file to the root of your project directory called .travis.yml. This file relays what type of project this is, how to configure the components required for the build and any additional steps you may want to perform as part of the build process.
For your Android project, at a minimum, you will need a file that contains this:
language: android
If this is all you put inside your .travis.yml file, Travis CI will look for a .pom file or a build.gradle file to build your project using Maven or Gradle, respectively. If neither of these is present, it will default to performing an ant build.
If you need more fine-grained control over what components are installed, you can explicitly define the Android components as seen below. But you usually aren’t required to add any explicit components. More documentation on the available options can be found here.
language: android
android:
components:
- build-tools-18.1.1
- android-18
- extra
By default, the gradle command that will run for Android projects is gradle build connectedCheck. This will attempt to run tests against a connected device (emulator). But since we mentioned earlier that we will implement tests at a later time, and for other reasons we will cover later, let’s override this behavior by specifying a script value. When we do this, we end up with the following contents:
language: android
script:
- ./gradlew build
This will instead just run the build gradle command that will check, test, and assemble all variants of our application. NOTE: this requires gradlew to be present in the root of your project.
4- Final touches
We now have a setup that will automatically kick off a release build when we commit code to GitHub. But before we call this effort complete, we’ll want to tidy something up with the default configuration. By default, Travis will kick off a build for every branch that you make a commit to and also each Pull Request that you submit. For us, this was a lot of unnecessary builds and we wanted to quiet things down a bit. So we added a filter to limit the regular builds to only kick off from master.
language: android
script:
- ./gradlew build
branches:
only:
- master
Now, by default, this will still kick off builds for Pull Requests, and that is something that we want. You can toggle this behavior by going into the settings area of your project inside the console and making sure the following setting is turned on:
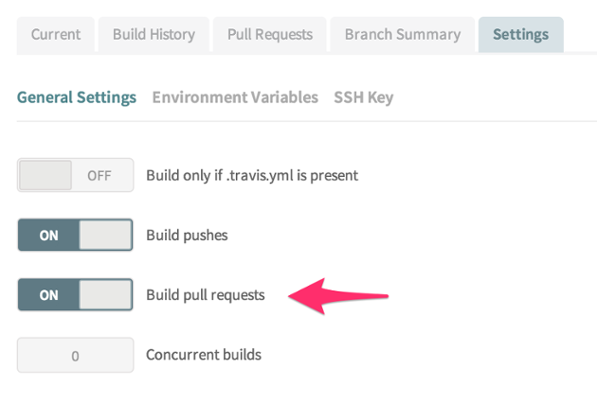
With this setting on, all Pull Requests will be built and listed under the Pull Requests tab in the main section of your project view. (This also includes a handy link to jump straight to the GitHub page for this PR.)
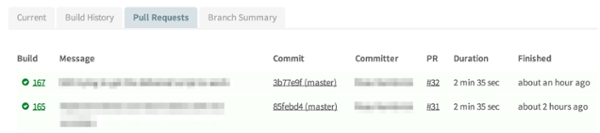
This integration is quite useful because Travis will report back to GitHub with the status of the build of that specific pull request and let the reviewer know if it built successfully or not (or if it’s in progress).

So, that’s how we get a build to automatically kick off when we commit code to GitHub, along with the added benefit of having the results reported back to GitHub. If you want to see this example in action, you can find the Travis CI build here.
Now, there’s a lot more that we can do and I’ll cover additional automations in future posts, like running tests, publishing releases, updating statuses in project management tools, sending notifications of build failures, etc. But, for now, this accomplishes our first step toward living The Continuous Delivery Lifestyle™.